We hope you are all enjoying the holidays!
Efwagames has a posted a several part video playthrough of Crimbo!
Part 1
Part 2
Part 3

Wednesday, 26 December 2012
Monday, 17 December 2012
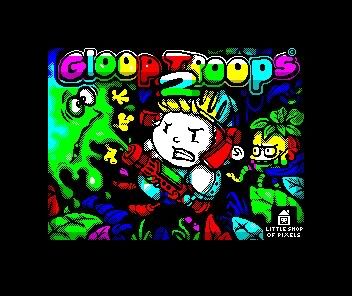
Mock up of Crimbo on the PC Engine by Sunteam

Monday, 10 December 2012
Crimbo on Indiegames.com!
Today Crimbo was posted over at Indiegames.com! We're very proud of the warm reception our festive game has been getting!! :-)
Wednesday, 5 December 2012
Crimbo reviewed in this month's Retro Gamer!
It was fastastic to see Crimbo reviewed in this month's Retro Gamer! We were doubly pleased to see it score 80%!
In other news we're busy sorting out our tech to power our next batch of Spectrum games, hopefully we'll have some screen shots we can share soon!
In other news we're busy sorting out our tech to power our next batch of Spectrum games, hopefully we'll have some screen shots we can share soon!
Friday, 3 August 2012
The plan
We've been thinking on how to progress with Gloop Troops 2 and have devised the current plan:
* We will use Andy's experiments with the Z80 C compiler Z88dk to form a new template code base.
* Port over our map renderer to C. This should be easy to do as the compressor was written in C, so creating the unpacker should be straightforward. Would anyone else be interested in using our map editor? It's designed with the Spectrum firmly in mind, it allows attribute setting per tile and uses brushes to create a screen. Each brush is a collection of tiles which can be stamped on screen.
* Write a simple game to test the water. I'd be helping Andy put this together over the next few weeks. The idea here is to make sure all the key parts of our pipeline are working in C. It will also allow us to see what kind of compromises (if any) there would be re-creating GT2 in C.
It does feel a bit backwards to try and recreate GT2 in C, but from Andy's experiments it looks to be promising, and with my injury still months away from getting better it looks to be the best solution for completing the game.
We've also been thinking about what platform to move on to next. We'd like to try tackling something fresh (but still retro), but are undecided. The idea of doing a port of GT1 with some extra bells and whistles has come up as a good way to learn a new platform. We're also interested in hearing from any other coders - ideally ones who have already put games out on a retro platform!
Current suggestions being floated around are: Amstrad CPC / C64 / Amiga (either 500 or CD32) and Atari Jaguar. Each has some interesting strong points. Do people have any strong opinions towards one of these? Is there another retro machine that people would love to see a new game on (and one where it's legal to release a game on)?
Sunday, 22 July 2012
Attending the Spectrum 30 celebration in Cambridge!
We'll be attending the Spectrum30 event in Cambridge in early September! It looks to be a great event and should have quite a few people from the Spectrum scene attending! Looking forward to catching up with people there! :-)
Saturday, 16 June 2012
More code delays :-(
Unfortunately my arm injury is going to take a few more months to get better, so development progress on GT2's code is on hold for a while. :-(
As the code development has slowed, we've been wondering what's best to do with the game:
* Finish up currently implemented features and release? This would get the game out there but it would be missing some key features that we wanted to implement.
* Take the time hit and probably release optimistically now at the start of next year. This would allow us to make gt2 all that it could be, but does mean a much longer wait...
* Find another coder to take over the code base / re-write? The code base is all in Z80 asm, and has largely evolved as the project grew. There's the potential that now we know what the game is and how it will function that we could write most of the logic in c using z88dk and drop to asm for sprite rendering / collision if required? Andy has done some experiments with z88dk and has done some asm, but with the artwork as well it'd be a ton of work...
Currently I'm favouring the idea of delaying code development for a few more months, though I guess we'll have to see how the next couple of months play out :-(
On a positive note I highly recommend checking out Soulless for the c64! It looks to be another stand out homebrew title!
Monday, 23 April 2012
Happy 30th birthday ZX Spectrum!
30 years old today and still going strong! Check out World of Spectrum to to see all the latest developments for the Spectrum!
Sunday, 25 March 2012
Wednesday, 7 March 2012
Slight development delay
I'm having to take a small break from GT2 development due to having to rest up my arm from an injury. Hopefully this will only add a month or so extra development time :-(
There's been more discussion on gameplay features for gt2 and for future projects. Hopefully we'll be able to discuss both of these very soon :-)
Andy has recently been experimenting with the z88dk C compiler. We're hoping to make the switch to C for future projects. This should hopefully make it much much quicker to develop our games! We'll then be able to focus more of our development time on gameplay features, and still have the option to drop to assembly for time critical code.
We would also like to see some of our future projects being written for, and take advantage of other retro platforms. Migrating to a higher level language allows us to re-use code across projects, and should further save us time.
Friday, 17 February 2012
The Making of a Spectrum Loading Screen - Part.2
In the second part of this article I`ll go through the process of converting the final loading screen bitmap to a ZXSpectrum loading screen.
The method we use is detailled below as a set of key stages.
Stage.1 - ZXPaint
The first stage is to convert the .BMP image to a .SCR file.
To do this download and launch BMP2SCR.exe - you can grab it here ftp://ftp.worldofspectrum.org/pub/sinclair/tools/pc/BMP2SCR1751.zip
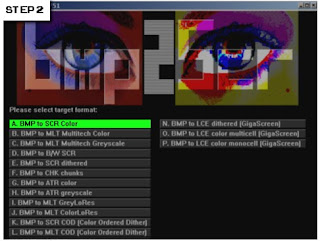
Follow the steps displayed in the image below. Anything green is a button you need to click.
The final step in the image has two options in green. You need to click on 'B=Toggle Bright' first.
In the third step, locate and select your final colour loading screen BMP image.
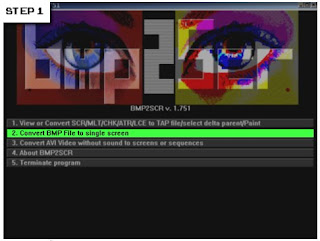


You'll now have a SCR file in the same folder, with the same name, as your original BMP image.
Stage.2 - ZX-PaintBrush
To start download, install & launch ZX-PaintBrush. You can grab it here http://www.zxmodules.de/zxpaintbrush/zxpaintbrush.html
Within ZX-PaintBrush 'Open' the .SCR loading screen file.
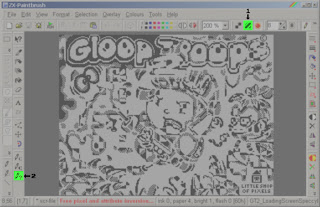
All looks good with your image? Switch off the colours (i.e paper colour=black & pen colour=white) and your image now appears scrambled!
As an example the below image shows the Gloop Troops 2 loading screen, imported from a BMP file, with the colours switched off.

So what's going on here? Simply the conversion process chose one of the two colours, in each tile, to be the paper colour (bits set to 0).
This meant that some tiles paper and pen colours were switched i.e. we have inverted tiles.
Because the colours are also switched the colour image appears fine. Remove the colours and the inverted tiles are revealled.
Thankfully ZX-PaintBrush has a toolset that allows for tiles to be re-inverted.
First thing to do is switch off the colour display.
Now select the 'invisible pixel and attribute inverter'pencil from the toolbar and click on any inverted tiles to revert them.
Below is screen shot of the ZX-PaintBrush UI with the colour display(1) and 'invisible pixel/attribute' pencil(2) buttons hi-lighted in green.
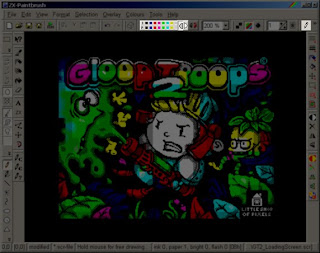
Once you've reverted all the inverted tiles you may now wish to add back in the half-bright colours on some of your tiles.
To do this I find the best thing to do in ZX-PaintBrush is to switch off the ink&paper colours as well as the pencil tool.
If you now select the half-bright option (dark semi-circle icon) you can click on any tiles you wish to set as half-bright colours.
Below is a screenshot of ZX-PaintBrush's UI. The areas of the UI that aren't darkened show the pencil tool, colour palette & half-bright attribute buttons.
When everything is complete, 'Save' it over the original .SCR file.
Stage.3 - Converting to a TAP file
We're now going to step through the stages that takes your game .TAP & loading screen .SCR file and combines them into a single .TAP file.
First thing to do is create a folder called 'MyGame''
This stage requires the pasmo z80 compiler. You can grab it from here http://pasmo.speccy.org/
Once downloaded, extract the contents to the 'MyGame' folder.
Now download BASTOTAP and extract the contents of the zip to the 'MyGame' folder. You can grab it here ftp://ftp.worldofspectrum.org/pub/sinclair/tools/pc/bas2tap25-win.zip
Now in your MyGame folder, create a file called Loader.bas and paste in the following lines of basic code;
10 PAPER 7 : INK 0 : PRINT AT 0,0
20 LOAD "" SCREEN$
Now create a file called LoadingScreen.asm and paste in the following lines of code;
org 0
incbin "LoadingScreen.SCR"
LoadingScreen.asm is the assembly file which will include the loading screen you've created.
Copy your loading screen to the 'MyGame' folder and rename it to 'Loading_Screen.SCR'.
Now open a command window and go to the MyGame folder. Type the following commands to build your game .TAP file.
bas2tap.exe -a10 -sLOAD loader.bas LOADER.TAP
pasmo --tap --name SCREEN LoadingScreen.asm LOADING_SCREEN.TAP LS.TXT
COPY /B /Y LOADER.TAP+LOADING_SCREEN.TAP FINAL.TAP
The first line calls bas2tap to convert your basic program to a .TAP file.
The second line calls pasmo to assemble your LoadingScreen.asm file ( which includes your loading screen image ) into a .TAP file.
The final line copies the basic loader and the loading screen .TAP files into your FINAL.TAP file which you can run in a spectrum emulator!
Drop this into a spectrum emulator and, hopefully, your game will now contain your loading screen!
This should now give you a good template in which to use when you wish to add a loading screen to your game.
Andy Oakley
The method we use is detailled below as a set of key stages.
Stage.1 - ZXPaint
The first stage is to convert the .BMP image to a .SCR file.
To do this download and launch BMP2SCR.exe - you can grab it here ftp://ftp.worldofspectrum.org/pub/sinclair/tools/pc/BMP2SCR1751.zip
Follow the steps displayed in the image below. Anything green is a button you need to click.
The final step in the image has two options in green. You need to click on 'B=Toggle Bright' first.
In the third step, locate and select your final colour loading screen BMP image.


You'll now have a SCR file in the same folder, with the same name, as your original BMP image.
Stage.2 - ZX-PaintBrush
To start download, install & launch ZX-PaintBrush. You can grab it here http://www.zxmodules.de/zxpaintbrush/zxpaintbrush.html
Within ZX-PaintBrush 'Open' the .SCR loading screen file.
All looks good with your image? Switch off the colours (i.e paper colour=black & pen colour=white) and your image now appears scrambled!
As an example the below image shows the Gloop Troops 2 loading screen, imported from a BMP file, with the colours switched off.

So what's going on here? Simply the conversion process chose one of the two colours, in each tile, to be the paper colour (bits set to 0).
This meant that some tiles paper and pen colours were switched i.e. we have inverted tiles.
Because the colours are also switched the colour image appears fine. Remove the colours and the inverted tiles are revealled.
Thankfully ZX-PaintBrush has a toolset that allows for tiles to be re-inverted.
First thing to do is switch off the colour display.
Now select the 'invisible pixel and attribute inverter'pencil from the toolbar and click on any inverted tiles to revert them.
Below is screen shot of the ZX-PaintBrush UI with the colour display(1) and 'invisible pixel/attribute' pencil(2) buttons hi-lighted in green.

Once you've reverted all the inverted tiles you may now wish to add back in the half-bright colours on some of your tiles.
To do this I find the best thing to do in ZX-PaintBrush is to switch off the ink&paper colours as well as the pencil tool.
If you now select the half-bright option (dark semi-circle icon) you can click on any tiles you wish to set as half-bright colours.
Below is a screenshot of ZX-PaintBrush's UI. The areas of the UI that aren't darkened show the pencil tool, colour palette & half-bright attribute buttons.

When everything is complete, 'Save' it over the original .SCR file.
Stage.3 - Converting to a TAP file
We're now going to step through the stages that takes your game .TAP & loading screen .SCR file and combines them into a single .TAP file.
First thing to do is create a folder called 'MyGame''
This stage requires the pasmo z80 compiler. You can grab it from here http://pasmo.speccy.org/
Once downloaded, extract the contents to the 'MyGame' folder.
Now download BASTOTAP and extract the contents of the zip to the 'MyGame' folder. You can grab it here ftp://ftp.worldofspectrum.org/pub/sinclair/tools/pc/bas2tap25-win.zip
Now in your MyGame folder, create a file called Loader.bas and paste in the following lines of basic code;
10 PAPER 7 : INK 0 : PRINT AT 0,0
20 LOAD "" SCREEN$
Now create a file called LoadingScreen.asm and paste in the following lines of code;
org 0
incbin "LoadingScreen.SCR"
LoadingScreen.asm is the assembly file which will include the loading screen you've created.
Copy your loading screen to the 'MyGame' folder and rename it to 'Loading_Screen.SCR'.
Now open a command window and go to the MyGame folder. Type the following commands to build your game .TAP file.
bas2tap.exe -a10 -sLOAD loader.bas LOADER.TAP
pasmo --tap --name SCREEN LoadingScreen.asm LOADING_SCREEN.TAP LS.TXT
COPY /B /Y LOADER.TAP+LOADING_SCREEN.TAP FINAL.TAP
The first line calls bas2tap to convert your basic program to a .TAP file.
The second line calls pasmo to assemble your LoadingScreen.asm file ( which includes your loading screen image ) into a .TAP file.
The final line copies the basic loader and the loading screen .TAP files into your FINAL.TAP file which you can run in a spectrum emulator!
Drop this into a spectrum emulator and, hopefully, your game will now contain your loading screen!
This should now give you a good template in which to use when you wish to add a loading screen to your game.
Andy Oakley
Sunday, 5 February 2012
The Making of a Spectrum Loading Screen - Part.1
Over the last couple of years I`ve worked on several Spectrum loading screens and I`ve wanted to share with you the techniques I`ve learnt along the way.
To do this I`ve broken it down into six key stages which I`ll go into now.
Stage.1 - Rough sketches
Before venturing onto the computer a series of rough sketches are produced.
At this stage I find drawing on paper is much quicker and fluid than drawing on the computer.
Below are a few rough sketches drawn for the Gloop Troops 2 loading screen.
Anything went at this stage. Putting any ideas down on paper, good or bad, seemed to spark new ideas so I kept drawing until I hit upon an image I was happy with.

Stage.2 - Finalised sketch
Once a sketch has been decided upon the next stage is to produce a detailled version of it.
The colour restrictions of the Spectrum make it hard to finally colour small details so try and keep the shapes and forms on your drawing as large as possible.
As a guide, a good tip is to print out a grid that contains the screen tile grid size.
Tracing paper, which the final image will be drawn on, can now be sat on top of this grid and act as a useful guide.
The final drawing is then scanned into the computer.

Stage.3 - The Black and White image
The scanned image now needs to be converted into a black and white image.
To do this we first reduce the scale of your image to the correct Spectrum screen resolution which is 256 X 192 pixels.
The image is now converted to black and white. In Photoshop,or one of the many free alternatives, the brightness and contrast settings dialog is opened.
The contrast setting is put to the maximum value. This will convert all the pixels to either black or white and remove any gray shades.
Sliding the brightness bar now changes the line thicknesses. The bar is slid until a desired line thickness is reached.
Below is the converted sketch produced for Gloop Troops 2.

Stage.4 - Background colour
Next stage is to fill any background areas with black.
I personally tend to use black over any other colour as it is easier to avoid any later colour clash.

Stage.5 - Colour blocking
The black and white image is now filled with colour.
We're not concerned about any colour clashing at this stage. Adding the colour is a good way of figuring out the overall look of the final loading screen. Removing any colour clashing can be done during the next astage.

Stage.6 - The Final Stage
This stage is the longest. Expect to spend a good few hours from here on bringing your loading screen up to the final version.
I personally find this stage the most enjoyable. Seeing the rough sketch slowly transform into a final realised loading screen is very rewarding.
For the remainder of this stage I will run through a few techniques, that I use.
Black dithering
I usually have the paper colour black for most of the tiles on my loading screens. This may sound limiting but it is surprisingly versatile when it comes to smoothing over ugly colour clashing.
The below image demonstrates this in action. The one on the left shows a typical situation where we have two shapes that have a nasty case of unavoidable colour clashing. We can't fix this but we can hide it!
The image on the right demonstrates using black dithering to hide the colour clash.

Thick Lines
Another technique is to make the outlines around the shapes quite thick.
The thicker lines allow the black paper colour to form a boundary between two different colours.
The below image demonstrates this in action.

Shadows
An alternative to the thick outlines are shadows.
Shadows are great as they can be the same colour as the background and act as a good 'buffer' between the different features of your loading screen.
If you're after a loading screen with a background colour other than black then this is a good technique to use.
The below image demonstrates this.

Shuffling things around!
Sometimes there are occasions where no techniques seem to hide colour clashing.
In these cases the only real option is to redesign this area.
Most of the time it'll just be a matter of moving a piece of the image around until it better fits the grid.
The key here is to not take your original drawing too literally and be prepared to redesign areas to work better with the Spectrums limitations.
Closely matching colours
When applying colour to smaller details on your image try and paint them with colours that don't clash badly. As an example, yellow and cyan work well with white.
This shouldn't dictate the palette you wish to use on your image but it might be something you wish to use in certain cases.
Grid display
When rendering the final stage it helps to have a grid (set to 8X8 pixels) over your image to act as a guid. It's a very useful tool when checking for any tile blocks that may contain more than two colours.
Conclusion
Below is an animation showing different stages of the Gloop Troops 2 loading screen from the initial sketch through to the final image.

Hopefully there are some useful tips that you can take from this post.
In my next post I`ll go into greater detail the initial design stage of a cutscreen.
Finally, as a bit of inspiration, here is a link to a collection of fantastic Spectrum images http://zxspectrum48.i-demo.pl/zxgallery.html
Andy Oakley
To do this I`ve broken it down into six key stages which I`ll go into now.
Stage.1 - Rough sketches
Before venturing onto the computer a series of rough sketches are produced.
At this stage I find drawing on paper is much quicker and fluid than drawing on the computer.
Below are a few rough sketches drawn for the Gloop Troops 2 loading screen.
Anything went at this stage. Putting any ideas down on paper, good or bad, seemed to spark new ideas so I kept drawing until I hit upon an image I was happy with.
Stage.2 - Finalised sketch
Once a sketch has been decided upon the next stage is to produce a detailled version of it.
The colour restrictions of the Spectrum make it hard to finally colour small details so try and keep the shapes and forms on your drawing as large as possible.
As a guide, a good tip is to print out a grid that contains the screen tile grid size.
Tracing paper, which the final image will be drawn on, can now be sat on top of this grid and act as a useful guide.
The final drawing is then scanned into the computer.
Stage.3 - The Black and White image
The scanned image now needs to be converted into a black and white image.
To do this we first reduce the scale of your image to the correct Spectrum screen resolution which is 256 X 192 pixels.
The image is now converted to black and white. In Photoshop,or one of the many free alternatives, the brightness and contrast settings dialog is opened.
The contrast setting is put to the maximum value. This will convert all the pixels to either black or white and remove any gray shades.
Sliding the brightness bar now changes the line thicknesses. The bar is slid until a desired line thickness is reached.
Below is the converted sketch produced for Gloop Troops 2.
Stage.4 - Background colour
Next stage is to fill any background areas with black.
I personally tend to use black over any other colour as it is easier to avoid any later colour clash.
Stage.5 - Colour blocking
The black and white image is now filled with colour.
We're not concerned about any colour clashing at this stage. Adding the colour is a good way of figuring out the overall look of the final loading screen. Removing any colour clashing can be done during the next astage.
Stage.6 - The Final Stage
This stage is the longest. Expect to spend a good few hours from here on bringing your loading screen up to the final version.
I personally find this stage the most enjoyable. Seeing the rough sketch slowly transform into a final realised loading screen is very rewarding.
For the remainder of this stage I will run through a few techniques, that I use.
Black dithering
I usually have the paper colour black for most of the tiles on my loading screens. This may sound limiting but it is surprisingly versatile when it comes to smoothing over ugly colour clashing.
The below image demonstrates this in action. The one on the left shows a typical situation where we have two shapes that have a nasty case of unavoidable colour clashing. We can't fix this but we can hide it!
The image on the right demonstrates using black dithering to hide the colour clash.
Thick Lines
Another technique is to make the outlines around the shapes quite thick.
The thicker lines allow the black paper colour to form a boundary between two different colours.
The below image demonstrates this in action.

Shadows
An alternative to the thick outlines are shadows.
Shadows are great as they can be the same colour as the background and act as a good 'buffer' between the different features of your loading screen.
If you're after a loading screen with a background colour other than black then this is a good technique to use.
The below image demonstrates this.
Shuffling things around!
Sometimes there are occasions where no techniques seem to hide colour clashing.
In these cases the only real option is to redesign this area.
Most of the time it'll just be a matter of moving a piece of the image around until it better fits the grid.
The key here is to not take your original drawing too literally and be prepared to redesign areas to work better with the Spectrums limitations.
Closely matching colours
When applying colour to smaller details on your image try and paint them with colours that don't clash badly. As an example, yellow and cyan work well with white.
This shouldn't dictate the palette you wish to use on your image but it might be something you wish to use in certain cases.
Grid display
When rendering the final stage it helps to have a grid (set to 8X8 pixels) over your image to act as a guid. It's a very useful tool when checking for any tile blocks that may contain more than two colours.
Conclusion
Below is an animation showing different stages of the Gloop Troops 2 loading screen from the initial sketch through to the final image.
Hopefully there are some useful tips that you can take from this post.
In my next post I`ll go into greater detail the initial design stage of a cutscreen.
Finally, as a bit of inspiration, here is a link to a collection of fantastic Spectrum images http://zxspectrum48.i-demo.pl/zxgallery.html
Andy Oakley
Thursday, 2 February 2012
Slight update to Gloop Troops and Gloop Troops: The Lost Crown
A slightly tweaked version of Gloop Troops and Gloop Troops: The Lost Crown is now uploaded to World of Spectrum! This contains a new QAOP and SPACE keyboard control option to make playing the game on real hardware a bit easier :-)
Monday, 23 January 2012
Working on pickups
Aside from trying to squash a bug with the new 'hunter' enemy type, we're currently working on some pick up designs. Earlier in development we had wanted to implement a smart bomb which would affect all enemies on screen. We're still investigating how this could work on the Spectrum ( as ideally we'd like each character to 'wiggle' when the bomb is set off ) but trying to come up with a method of moving all the enemies has proven a bit problematic.
If we move them on screen then there's a chance they'll overlap some of the background graphics and so over-write what was there. We're thinking about some ideas of swapping to a smaller 'stunned' graphic ( similar to the glooped animation ) so we'll see how that goes.
Next up we have a stop watch - this will pause all enemies on screen for a few seconds ( and stop the timer from ticking down ). This should help give the players enough time to get through a screen :-) One thing we're not sure on is whether enemies should still be deadly to touch when they are stunned?
The other pickup is a weapon upgrade. The regular shot will have a much smaller range in Gloop Troops 2 than it did in the original game. This means you won't be able to find a safe spot on screen and hide from enemies!
Still lots to do! Hopefully some more screens will be uploaded soon :-)
Monday, 16 January 2012
Gloop Troops 2 - Loading Screen
I thought it was time I uploaded some more artwork for GT2.
I`ve started the new year with the loading screen artwork.
It took, on and off, three days to complete.
Wednesday, 11 January 2012
Gloop Troops: The Lost Crown is now available on World of Spectrum!
Gloop Troops: The Lost Crown is now available to download and play on the World of Spectrum archive. We hope you enjoy our game!
Saturday, 7 January 2012
Gloop Troops: The Lost Crown in nominations for 2011
Our Gloop Troops: The Lost Crown ( distributed on the iOS The ZX Spectaculator emulator is in the list of nominations for the 2011 best Spectrum game! Please vote if you've enjoyed playing our game!
Tuesday, 3 January 2012
Happy New Year!
Happy new year all! We've been working away on Gloop Troops 2 the last few months ( with a bit of a break for some festive fun ) and are hoping to not be too far off from releasing the game. Gloop Troops 2 has now been in development for quite a while! We never anticipated the game would have taken this long, but we've all been busy at one time or another, and re-writing the game to take full advantage of the 128k Spectrum has been quite a challenge.
State of play:
We have the main game structure for Gloop Troops 2 in place. You can start a new game, view the opening cinematic, then move around the world map to pick a level. Once you've chosen a level you'll be whisked off to that level to try and collect all the ingredients for Princess Amelia's cure. Once you've beaten all the levels in a world you'll unlock a boss level. Only after finishing the boss level will you be transported to the next world. Between worlds you'll have additional cinematic screens with a final cinematic when you finish the game!
To do:
- More enemy types! We have a few more enemy behaviours to go in.
- New feature! We have an unannounced feature to go into the game. It shouldn't take very long to do and will add a lot to the level design.
- Keyboard support.
- Support for better sprite masking.
- Refine levels, pick the best ones and make them final.
- Music! There will be many more tracks of music in Gloop Troops 2 compared to Crimbo.
Subscribe to:
Posts (Atom)